

I love an easy DIY, and upcycled candle jars couldn’t be any simpler! All you need is a little time, a used candle, water, and Goo Gone to get the job done!
First, let’s talk about candles! A few of my favorites and the ones I’ll be working with today are from Mrs. Meyers and Bath & Body Works. I recently discovered the Mrs. Meyers lavender candle and have bought quite a few. Aside from smelling great, they also come in the cutest jars, which I always take into account when purchasing my candles. If the jar is ugly or looks difficult to repurpose, I’m less likely to buy the candle.
Upcycled Candle Jars
Over the years, I’ve gotten into the habit of storing the majority of my brush pens and markers in upcycled candles jars. I love the look of all the unique glass jars on my shelf, and I like that they don’t cost any extra since I’ve already paid for the candle that the jar originally came with.
Recycled candle jars can be used all over your house! They’re great in the bathroom for holding cotton swabs or in the kitchen holding toothpicks.
Now, let’s get down to the DIY! This project is really easy but it does require a bit of time. I like to think of it as a “set it and forget it” type of thing! You’ll see why as we dive into the how-to down below.
Supplies:
- Empty candle jar
- Goo Gone
- Water and a way to boil it (I’ll be using a hot pot)
- Paper towels
- Butter knife

First, we’re going to boil water and pour it into each jar. It’s important that the water you are using is super duper hot. I wait until my water is at a roiling boil before I pour it into my jars. Pour the boiling water almost to the top of each jar.
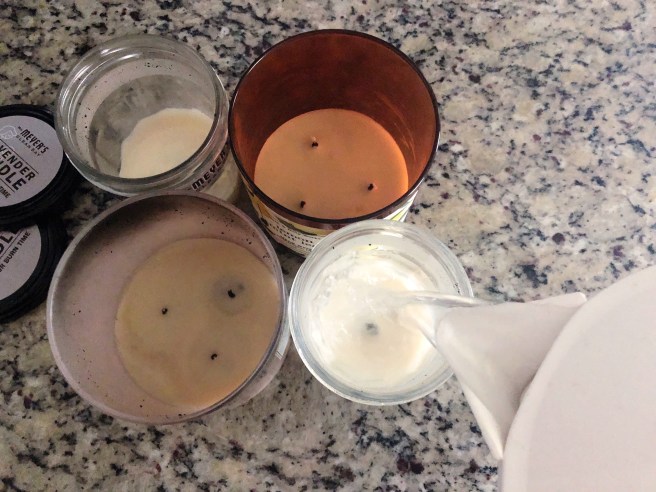

Right after pouring the boiling water into your jars, you’ll see the leftover wax in the bottom of your jars immediately start to melt and rise to the top. This is actually a pretty cool thing to watch. It looks a lot like a lava lamp! After pouring your water, you’re just going to walk away.
Check back every few hours and look at the wax in your jars. Once the wax is completely opaque, it’s time to remove it. Every candle is going to be different, so just check yours a couple times throughout the day. Maybe once an hour or so.


Once your wax has hardened, it’s time to remove. Simply take your fingers and press (gently at first) on one edge next to the lip of your jar. As you apply pressure, the wax will loosen, and eventually the entire disk will come loose and you’ll be able to lift it out.
Once you’ve removed your wax disk, check to see if there is any additional wax at the bottom of your jar. My candles were very waxy, so I repeated the steps above one more time to remove the rest of the wax.
[Related: Easy DIY: 3 Uses for Acrylic Place Cards]

Once all the wax is out of your jars, it’s time to remove the wicks. All you have to do here is generously pour (or spray) some goo gone into your jars. Again, I just let the Goo Gone sit for a bit — maybe an hour or so. Then, I take a butter knife and apply pressure to the metal disks holding each wick. With a little pressure, you should be able to knock the metal pieces loose from the bottom of your jar.
With Bath & Body Works candles, there will be a little spot of glue that you will need to remove as well. Usually, I just take my butter knife and rub it along the bottom of the jar until all the glue comes up.

Now, it’s time to remove the jar labels! For this, you’ll need more Goo Gone and some paper towels. I’m very generous with my Goo Gone, so I drench each label in it and then place a paper towel over top. The paper towel helps absorb some of the excess Goo Gone and also helps keep your Goo Gone in place right on the label instead of dripping off the sides. Again, I let this sit for an hour or two (it really depends on the material of your label.)
When the labels look good and saturated, I go ahead and peel them off. Once your labels are off, it’s time to wash your jars. I usually take a paper towel (maybe with a little more Goo Gone on it) and rub it around the inside of the jar to remove any excess wax and then I throw everything in the dishwasher!
Once your jars come out of the dishwasher, they are ready to reuse!
Yay for new decor pieces and upcycled candle jars!
[Related: Easy DIY: Hand-Lettered Doormat]

Affiliate links are in use in this post.